Showing posts with label Animation Curve. Show all posts

12 February 2012

My Way of Animating2


 ここ暫く、レイヤードアプローチというのを習ったり、演技の勉強をしていたり、新しい発見が沢山あったので、自分のワークフローをまた書き直したいと思います。書き直したいというより、僕の場合は常に新しいやり方でやってますね。でも一応、前回のワークフローから改善点が結構あると思います。今回は、アニメーションをやりながら撮りためたものをアフターイフェクトで全部編集した動画を作りました。(楽しかったw)


まず、レイヤードアプローチというのは、体の部分部分で分けていって、動きの中心となるところから動きを付けていくみたいな感じ、例えば腰から、胸、首、頭みたいな感じ……だと、思っていました。w


いや、基本的にはそんな感じなんですが、僕が理解してる雰囲気だと、もっと「順番にやっていく」っていうと分かりやすいかな。そんな感じに理解してます。(間違ってる可能性ありっw)

例えば、今回のアニメーションはフレーム1から、フレーム216まで(9秒くらいですかね)の長さなんですが、この演技の中で細かく分けて行けるんですねー


こんな感じです。これは、一度に100フレームとかやると、細かい動きまで見れないので。このそれぞれの動きがあるじゃないですか、そのそれぞれの動きの中で何が一番大切かを決めて、その動きから作っていくんです。

まずは、大きい動きは、腰から背骨の全体的な動き(ちなみにほとんどの動きはここが一番大切だと思います。)、あとは、サイコロを投げる右腕ですかね。だから、まずはそこを抑えておく。それで次に何が大切か…うーん、多分首、頭ですかね。で、感情がちゃんと動きと会ってるのを確認したいので眉毛、目線、まぶた…とかですかね。は、ため息の時に背骨が前に曲がるので、そこをちゃんと作って。後ここで大切だったのが、背中・頭・右腕の動きのタイミングのずらし方ですね。レイヤードアプローチだと、一回一回一つの動きに注目するので、こういうタイミングをずらしたりするのは結構やりやすいと思いますよ。で、のびっくりのリアクションは、顔が大事なので、前の①②とは違って、眉毛、まぶたからアニメーションやりました。これで、ベースとなるタイミングを決められるので良かったと思います。ちなみに、レイヤードアプローチの弱点として、なんか動きがバラバラなる。みたいな事が起こりやすいと思います。こうやって、細かく分けてやっていくので、前後の演技とのバランス等がめちゃくちゃになりやす。なので僕は常にちゃんと演技が流れてるか前後を通して確認してます。今回のはいい例で、つなげてみたらリアクションが大きすぎて変だったので、やり直しました。動画にはあえてそこも載せておきました。は、①②と同じく腰・背中から始めました。あとは、机をバーンッてやるので、その右手も早めからアニメーションしました。


あと、mayaはこんな感じのセットアップでやりました。動きは常にアニメーションカーブで作っていく感じですね。ここも個人的は今回から大きく変えました。今までは、カメラから見て動きを作っていって、最後にアニメーションカーブを直していく。という感じでやっていました。このやり方だと。

・デメリット…どのカーブがどの動きを作っているか分からなくなる、カーブを綺麗にするのに時間がかかりまくる、ギンバルロックが起こってる事を最初は無視出来るが後々悪夢って事になりやすい

・メリット…自分が思ったとおりのポーズが作りやすい(これすごいメリットですけどね)

それとは対照的に、カーブで動きを作っていった場合は、

・デメリット…思った通りのポーズを作るのに結構時間がかかる、最初に思った通りのポーズを作れずだんだん出来上がっていく感じなので最初はポーズをイメージしにくい

・メリット…必要なところにだけキーを打てばいいので後々カーブを綺麗にする必要がない、それによってものすごいアニメーションが早くなる

まあ、一長一短って感じですかね。僕のやり方は、ハイブリッドって感じです。特にどっちでいくっ!!みたいに決めてはいない。みたいな。

それでは、色々まとめた上でもう一回。


あとは、上に書かなかったですが、演技に関連して。今回のアニメーションテストで、色々自分で決めたキャラクタ・シチュエーション設定をメモしたものも貼っておきます。
メモなので、字が汚いとか英語の下手さ加減はご愛嬌。ちなみに、最初から動画の最後のファイナルのところまで10時間くらいかかりました。うーん、普段よりちょい早いかなと。

では、ありがとうございました。

14 September 2011

Pixar Class Week 2

  • Not showing anticipation-----feel like some other force applied to
  • accelerate until foot leaves
  • after contact frame-----spacing is getting more small
  • need show very obvious contact frame!!
  • it is difficult to stay at the same place when the torso moves so much spaces-----step forward
  • contact frame is STRAIGHT
  • at least 3 frames are required to let audience see what it going on the screen
  • heavy ball takes a lot more frames to stop-----root is the heaviest part of the body(ball)
  • every frame should be able to tell a story-----posing is very important
Polish Checklist
  1. Show People
  2. Pose++
  3. (Drag) Loosen Body
  4. PBJ-----Physics Believable Jiggly
  5. Intersection
  6. Arcs&Spacing-----trace root, nose, wrists, elbows, feet and knees
  7. Show People!!
  • Trace nose-----can see what causes weird movement going on the torso
  • Jiggling-----(ex, 4frames-6frames-8frames start move around with 4 frames)
  • GLEN KEANE-----TILT, RHYTHM, TWIST
  • SEE contact poses!! not only feet but hands, contact pose is straight!
  • Neck-----massage overall shape of the torso

06 September 2011

Animation Curve

How Do You Deal With the Animation Curves for a Character?


While working in the Pose to Pose Method
In step mode key every control on full poses- By keying every control for a pose you will be locking all of the elements of the character into position and keeping your curves clean. You will most likely not be utilizing every control, but you want to make sure that you are holding it's value. If you don't key it in and that control is used in a pose further down the timeline, eventually that value will drift over a series of frames causing floaty movement. Sometimes I do not include the facial controls when keying the full character.

Work clean- Keep track of what controls you are using to form a pose and try to stick to the same ones for your next one. By keying the same controls you will avoid animation curves that counter each-other.

Use tight break downs- Well what do tight breakdowns have to do with using curves? If you use breakdowns to fill in the gaps of your animation you will be relying less on the computer in-betweens. That way you will be saving your use of curves for what they are best at...refining.

When my keyframes are all set and I start breaking down my shot. I like to insert full breakdown poses on every controller on at most every 4 frames. When I set the break downs I am focusing on my transitions. Will this breakdown pose favor the previous pose and act as an ease out or will it favor the following pose and act as a fast out? Should I add a breakdown after my key that overshoots the pose? I keep these things in mind so that I use the posing of the character to dictate how the animation curves will be shaped.

Switching over- Once you have full poses on every control of the character on every 3-4 frames than you are safe to switch into a spline curve type. I like to use a spline type that will show a nice preview of my animation without having to clean up any tangent handles. I do this by using plateau tangents or spline with the auto-tangent script.

Hold off on offsetting- Once I switch over I will hold off on offsetting keyframes until I have taken a pass to tighten up the timing and posing. This is the first time I am seeing the animation on ones so there may be some tightening up to do. I will push full poses around on the timeline to adjust the timing and adjust the placement of certain body parts so that I can work some built in overlap into the poses. By working this way I am able to get my animation pretty far along before digging into individual curves.


Tie down your curves. -Usually, the first time i adjust animation curves on a pose to pose shot is the tie down. In this pass I will go through and edit the curves on the main body parts. (Usually the root spine and head, sometimes limbs) When I go through to clean up the curves I am looking for places where the curve is obviously not flowing like it is supposed to. For example maybe there is a curve that makes a hard transition that ends at two equal keys that form a flat. If I am not looking for a hard stop in my animation I will adjust that first keyframe that makes up the flat to ease out of the transition.


Cancel out counter animation- The tie down pass enables you to clean up your curves but it also serves as a pass to help you get familiar with what is going on under the hood and which controls are doing the heavy lifting. You should keep an eye out for counter animation during this pass. Counter animation happens during a transition where the value of one control cancels out the value of another. This tends to happen frequently on the rotate Y axis for Stewie and Bishop. If you see places where one control counters another see if you can remove the animation from one of the controls and add it to the other or redistribute the movement equally between the two controls.

Timing and Spacing

Animation Mentor Webinar "Timing and Spacing"

anticipation

overshoot

overshoot relates to the heaviness of the body part

ex) woody's head is heavier than his body so his head is doing overshoot little bit

timing and spacing is really important to show the weight of the character

timing ans spacing is making a completely different feeling

31 August 2011

Hold or Not Hold?


I remember what Tom told me a few months ago, he told me I need to make more “Transition Pose”. To tell the truth, I was like…yeah…umm…maybe, I understand.

But I guess we need to apply to something practical to understand correctly, and I just run into the situation that required me to face some similar stuff yesterday. Basically, as far I as know, most of the animation teacher told us to make “HOLD”, pose, hold pose, hold…something like that.


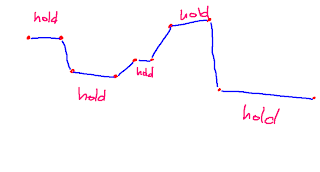
Yes, I guess this method really works well especially when we animate in pose-to-pose, but the thing for me is sometimes this ends up with very solid, not fluid movement. Of course, as I had drawn intestinally, hold should not be just “Hold” but needs to be added some more ease-in and out, spacing stuff. Even though, sometimes still looks solid.

Yesterday I was working on my animation test and, dealt with my timing really carefully (since the main focus right is timing and spacing for me), I didn’t know why but I could not get the timing I wanted. So what I did was DELETE some pose of the end of the hold. This is how it looked.


This is not something new actually; this is just all about,

We don’t have to hold so long every time!!

But I didn’t notice that this really helped me change and add variety of timing in animation (in this illustration, those poses might look more breakdown but I guess it’ OK as long as it works).

I guess now I understand what Tom meant at that time.

07 August 2011

Hold me tight!

I have been studying timing and spacing theses days especially, and one thing I notice that "HOLD" is really important to make contrast in timing (which is not something "WOW NEW INVENTION!!GENIUS!!" tutorial just a basic principal but Sean just told me we need to go back to basic once we learned everything)

Here's my clips from my animation test...


I think it's fairly OK...for me, looked slightly same rhythm, beat..pon,pon,pon...something like that. I wanted more contrast, something that BREAKS my good boy timing. So far, the timing is like that.
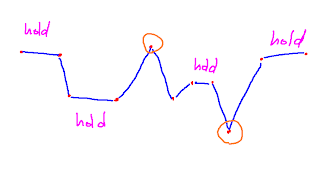
the last timing was not same as other two poses but still same for me, I wanted more clear contrast, Having said that, I still liked the transition timing, one pose to another. So what i did was to change the "HOLD" timing, not "TRANSITION" timing.

Now the timing for looks more like...this!
I liked that, and I will go with this timing. Yes, one thing I noticed from this was, when we need to change the timing, we have to think two different timing. "HOLD"and"TRANSITION"timings.
When we have two poses like this, we have to think the timing. We have to think timing carefully because timing and spacing is everything in animation. I used to only have one question before...

How long does it take one pose to another?
but sometimes it's really difficult to put variety of timing in animation because the character's action needs to be physically correct, otherwise we are going to lost believability. Audience doesn't believe this character is alive. So what we can change then is...hold!! Here's another question to myself.

How long does it hold until the next movement?
Now I have a lot of different options when I think of timing, and I remember some animators said "HOLD" is really important to show character's thought process. I will need to consider every time. I will hold this idea tight not to forget!!


02 August 2011

Tutorial: Splinophilia Part 2

Tutorial: Splinophilia Part 2

I used to not believe animation curves when I was animating, I used to think what is important is what I see in the shot camera. I still think so in terms of posing, but I kind of think that in terms of movement, curves are really important. So now I'm trying to have different thoughts at the same time, as like Sean said...lick an ice cream.

I can't believe myself animating without touching curves, but I believe it important to learn WHY it is important by myself...otherwise, What the hell was I doing at that time?

24 July 2011

Animation Memo

今日やってて気付いたこと。Breakdownを作るときに、カーブを見ながらやるとfavorが良い感じ調節出来そう。今までずっと、key poseと同じようにカーブなんてあんま気にしなかったけど、これはいい。いい気付きですねーこれは。あと、ポーズ自体がカーブ的におかしいとやっぱどんなにいいbreakdown作っても動きがおかしくなる気がする。同じポーズでもその裏のカーブを扱わないとダメだね。